Pages

Thursday, December 30, 2010

Final entry for the year?

Punya la malas nak tulis so just wanna share what I had written in FB Notest masa I sibuk2 nak tanam parsley last few weeks..

With help from Mr Wiki and En Wiki, this is what I found:

1. Daun Saderi = Daun Sup = Celery = Apium graveolens

Celery leaves and stalks


Celery Plant

2. Daun ketumbar = Coriander Leaves = Chinese Parsley = Cilantro = Coriandrum sativum

Coriander leaves

Coriander Plant

3. Parsley = Petroselinum crispum

Two main parsley groups used as herbs are:

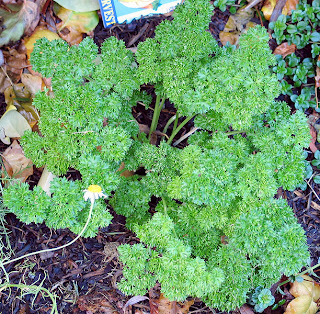
a) Curly leaf = P.Crispum Crispum Group

Curly leaf parsley plant

b) Italian = Flat leaf = P. Crispum Neapolitanum Group

Italian or Flat leaf parsley

Saturday, August 14, 2010

what's for dinner?

So what's for dinner? Baru masak 3 hari dah kecoh x tau nak masak apa :) Tapi selalu macam ni la kalau bulan puasa (kalau ganti puasa pun macam ni gak) macam2la rasa nak makan tapi bila tengok resepi macam leceh je terus kensel.. heheheh..

So far, combination lauk yang dah masak in the last few days:
1. Telur masak kicap + ayam goreng
2. Ayam masak merah + ikan keli goreng
3. Asam pedas + telur dadar
4. Nasi goreng belacan + udang goreng kari

So, nak masak apa lagi hari ni? Hmmm.. antara yang sedang diconsider adalah berikut:

1. Nasi Ayam


2. Ayam paprik

3. Grilled chicken thighs


4. Sambal sotong


And perhaps a chocolate cake for dessert?

Wednesday, August 11, 2010

Ramadhan

Have a blessed Ramadhan y'all!

My wishlist from Pasar Ramadhan:
Nasi Tomato
Nasi Kerabu
Bubur Lambuk.. slurpp...
Tepung Pelita
Bronok
Popiah

Yummy~~~

Wednesday, August 4, 2010

baking in glass dish

Now that  I know for sure my oven is still working, I am itching to bake a cake. I don't own any baking tin though. After successfully baked the lasagne (read: nothing was broken and no one was hospitalized after eating it) in my glass dish, I wonder if I can bake a cake in it too.. I have googled about baking in glass dish and found many positive response on it but I am just still not confident as my mom says that a drop of water could break my dear pyrex.. For someone who does not have a budget to buy a pyrex in anytime soon, that really scares me..

So, dear friends and readers (if any), kindly advise if I can bake this
in this?

Monday, July 26, 2010

photo album vs photobook

Adam is going to be two in a month. Just like any parents, we have many photos of him.Unfortunately, almost all of them are in digital form. We only have 2 albums of Adam as a baby. Those albums covered the first few months of Adam as a baby.


Apart from laziness, another main factor is the cost. It is very expensive to print a photo. What more if you have thousands of pictures that you need to pick from. And all of them made your baby look cute.. What a tough decision to make!

Or should I resort to photobook instead?


But with so many of them in the market, how do I know which one offers the best quality for money? And to think of the work you have to go through to organize the album before sending it to print, can make anyone give up without even trying.

Which material would be best? Which photobook has the most user friendly tools? What is the best way to organize the pictures? How long would it take to be ready? What if the quality is not as per they claim? Which pictures should I pick? How many pictures can fit into a book? How much would a book cost? And the list of questions continues...

So, anyone out there who has the experience please do share with me :)

Thursday, July 22, 2010

Siri Mari Memasak: My first lasagna!

Last weekend, we were invited to a surprise birthday party for two of our dearest friends. Dalam email tu semua orang offer nak bawak tu la ni la.. I wanted to bring something too tapi apa??!!! Pening kepala fikir sebab macam semua main meal and dessert dah ada.. nak bawak sesuatu yang orang nak rasa walau sikit so xdela membazir nanti.. tapi tamola susah2 sebab sepatutnya my schedule was quite pack that Saturday..

Fikir punya fikir finally I decided to bake a lasagna! Dahla oven pun tak sure boleh on ke tak.. main redah aje :) So bermulala episod mencari resepi yang paling senang dalam internet.. kalau boleh nak yang bukak botol, tuang dalam baking tray and bakar terus aje.. hehehehe.. pemalas kan :)

Cari punya cari still x jumpa jugak.. Red suace to confirm la sama macam bolognaise je kan so xde problem.. White sauce ni la yang nampak macam renyah sket.. dahla bila tanya my cousin yang sangat tere buat lasagna, dia kata kena kacau selalu supaya tak berketul.. ayarkk.. ni yang malas nie... Bila pegi shopping for the ingredients, saje la tengok ingredients dalam Alfredo sauce and tengok eh, macam sama je dengan recipe white sauce.. ada cheese ada susu ada pepper so selamba je beli :)

Bila tanya dengan head chef bidan terjun of the day (my cousin yang belajar hot & cat at UiTM), dia rasa sket Alfredo tu and dia kata rasa macam white sauce dah ni.. Makanya kami pun terus mulakan rancangan masak-masak kami..

So here is the step by step recipe to make the easy peasy lasagna :) Konfem senang tapi kesedapannya x jamin :)


Some of the ingredients..

Mula-mula, rendam lasagna noodle dalam air panas.. This was a mistake though, because:
1. We put 2 boxes of the noodle dalam mangkuk yang x berapa nak besar.. muat-muat je semua noodle tu..
2. Rendam lama sangat and by the time nak start layering tu, some of them dah melekat and susah giler nak leraikan..
3. We did not read the instruction on the box! My other cousin (yang tere tu) said, you don't even need to soak them.. duuuuhhhh...

Dalam resipi banyak kata guna Italian Sausages.. err.. mana nak cari.. so, ganti dengan Ramly sausage ajelah..

Ni dua tin button mushroom yang di'slice' nipis-nipis..

2 paket minced meat

Mula-mula, tumis satu sudu rumbu bawang blend and satu sudu bawang putih blend.. I guna planta sebab tak ada olive oil la pulak kat rumah..

Kemudian masukkan minced meat and kacau sampai daging tu dalam setengah masak..

Then, masukkan sos Prego Traditional satu jar besar..

Kalau rasa x cukup tomato, tambah tomato puree pulak.. I guna setin lebih sikit...

Last but not least (untuk red sauce), tambah garam secukup rasa..

Sapukan baking tray dengan planta sket supaya tak melekat

Bolehla mulakan susunan dengan lasagna noodle paling bawah

Ni dia Alfredo sebagai ganti white sauce

Sapukan kat atas lasagna noodle tadi

After letak another layer of noodle, letak red sauce then tabur sausage and mushroom kat atas dia..

Masa ni bolehla sprinkle some oregano and thyme kat atas red sauce tu..


The next layers adalah atas kreativiti masing-masing ye puan-puan.. kalau ada banyak sauce letakla banyak lapis.. kalau nak buat banyak bekas bolehla buat sikit lapis je... nak campur dengan cheese ke apa ke macam gambar ni pun boleh...

Yang final layer kat atas sekali, bolehla letak white sauce and shredded mozarella cheese sampai penuh.. Then sprinkle some parsley kasi cantek sket :)

Then bakar dalam oven at 180 degree celsius for 40 minutes bergantung kepada ketebalan lasagna anda..

Tadaaa!!!!! Abaikan lapisan yang sangat tebal! sebab ni version makan kat rumah.. yang bawak pegi party tu nipis sket la :)

Selamat mencuba!

Wednesday, July 21, 2010

Finger Painting!

After months of toying with the idea of having a finger painting session with Adam and weeks of asking around on how to make the paint, I finally made it! When I was cleaning the study room to make way for my cousin who is staying with me for the time being, I found a roll of mahjong paper and decided it is time to try finger painting with Adam.

After a scrumptious lunch (will blog about this soon) last Saturday, I prepared the paint and stripped Adam down. Actually I wanted to buy yellow, red and blue food colouring but yellow was out of stock so I replaced it with Orange instead.. to mommies or aunties or anyone out there who wants to make your own paint, here is how you do it..

First, you mix some flour, corn flour and water in a bowl.. (you can google for the recipe I just add in until I get the consistency that I thought was right ;p)


Then, you divide the mix into 3 other bowls for 3 different colours.. or as many bowls as you want.. I decided to use 3 colours red, blue and yellow (orange) because I remembered En Ahdan (my form 1 Arts teacher) taught us that these are the 3 basic colours (please correct me if I am wrong). You can get purple, orange, green and many other colours from these 3 colours..

I used these food colours to ensure the paint is edible in case Adam decided he is suddenly hungry and needs to eat the paint..


Just use one or two drops of the colour for each bowl.. Don't worry, the stain on your clothes will be washable :) That is if you use just a drop or two like me.. I dare not guarantee if you use too much of them.. But as precaution, just wear your oldest and darkest pair of shirt..

You will get three bowls of paint like this.. Noticed that each filled less than a quarter of the bowl? This is more than enough for a session with a toddler..


Make sure you cover your floor with newspapers, just in case...

Then, just get a large piece of paper for your child to channel his or her creativity.. I know that if you google it, many of them says get a thick paper or cardboard as the wet paint might tear the paper.. Don't worry about it.. This mahjong paper or any paper will do.. You can always dry it out later if you decide to keep it.. I did not so I don't really care :)


And now, you can start painting!!

It was not easy for me to get Adam to stamp his fingers on the paper.. He preferred to use the brush to paint his body! I hope Adam enjoyed the session because I know I did :)

Here are some pictures of Adam during the session..

At first he ran away and showed his dirty hand saying eeeeiiiiii!!!!


Eeeii!!!! My hands are dirty!!!


It was not an easy task to get him to transfer the paint onto the paper


Then he realised that it feels good to rub the paint on the paper


Hey! I can transfer it to my feet!


Adam used brush to paint the hard to get area


Finish mommy! Can I have some more please..


Let me double check if there is any left..


Thank you Mommy! I had fun!


Tadaaa! Adam's first masterpiece..

In case any of you were wondering, the paints on Adam's body were easy to clean. I just used his normal body shampoo. No need for scrubs whatsoever :)

Good luck trying!